Whilst we endeavour to make our plugins as easy to use as possible. There will inevitably be queries on how to do certain things with them. Please find answers to the most common queries below and for further support please check our 3D Resources or contact Web and Print Design if you need further assistance.
Augmented Reality (AR) is an interactive technology that superimposes digital objects onto the real world, allowing users to see and interact with a virtual representation of the physical environment. Integrating AR into a website can provide several benefits for business owners, including:
Enhanced customer experience: AR can provide an immersive and engaging experience for customers, allowing them to interact with products in a more meaningful way. For example, a furniture company can use AR to allow customers to see how a particular piece of furniture would look in their home before making a purchase.
Increased engagement and conversion: AR can help capture the attention of website visitors and increase engagement with the website content. This can lead to higher conversion rates and increased sales.
Improved brand awareness: By integrating AR into their website, business owners can create a unique and memorable brand experience that sets them apart from competitors. This can lead to increased brand awareness and recognition.
Better product visualization: AR can help customers better visualize and understand a productโs features, benefits, and capabilities. For example, a company that sells complex machinery can use AR to provide a 3D visualization of how the machinery works.
Cost-effective marketing: AR technology can be a cost-effective way for business owners to market their products and services. By providing an innovative and interactive experience, businesses can generate buzz and attract new customers without spending a lot of money on traditional marketing campaigns.
Overall, using AR on a website can provide a range of benefits for business owners, including enhanced customer experience, increased engagement and conversion, improved brand awareness, better product visualization, and cost-effective marketing.
FAQ
Are there additional costs?
If you use the free version of the plugins then there are no costs involved, however you will have limitations to the number of 3D models you can have on your site.
If you use a premium version of the plugins then there is a monthly subscription fee for the plugin to support unlimited models and to receive the plugin updates for the duration of your subscription.
How to install the plugin?
How to install
To get started, youโll need to install the AR for WordPress plugin. You can do this by navigating to the WordPress plugin repository and searching for โAR for WordPressโ or โAR for Woocommerceโ. Once youโve found the plugin, click โInstall Nowโ and then โActivateโ.
Manually
Upload the โAR for WordPressโ or โAR for Woocommerceโ plugin zip file to the /wp-content/plugins/ directory and unzip it
Activate the plugin through the โPluginsโ screen in WordPress
Visit the AR Models ->Settings page to configure the plugin
What 3D model formats are supported
AR for WordPress and AR for WooCommerce display your 3D models using the model-viewer html5 tags. This system supports the use of USDZ, GLB and GLTF 3D model file formats. For further information please visit our 3D resources section.
Do you support iOS and Android Devices?
Yes, our system supports both iOS and Android devices. You can upload a GLB or GLTF file for display on both Android and iOS, or you can also upload a USDZ file for iOS.
iOS devices need to be running iOS version 12 or newer.
The plugins utilise the model-viewer open source scripts which according to their site currently support the following browsers, however Safari works too. https://modelviewer.dev/#section-browser-support
Can I host the models on another Server?
Yes. When adding/editing a model click on the โShow Model Fieldsโ link to display the field where you can enter a url to file at a different location.
Why does my model sit in a strange position in AR?
If you donโt have 3D models there are a number of solutions available to you, including downloading existing models from online libraries, creating your own models using your mobile phone or tabletโs cameras or commissioning a 3D model to be created. Please visit our 3D Model Resources section for more details.
How do I enable GLB MimeTypes?
You may need to enable GLB file support by adding a line into your .htaccess file
AddType model/gltf-binary .glb
The line AddType model/gltf-binary .glb in the .htaccess file instructs the web server to treat files with the .glb extension as model/gltf-binary MIME type. This is relevant for serving 3D model files in the GLB format, allowing browsers and applications to handle them correctly. Without this directive, the server might serve these files as plain binary data, which could cause compatibility issues.
Support Included?
Support for our plugins is provided via the WordPress.org support forums.
1. Log in to your WordPress site dashboard
2. Under AR Models click on Categories to open the category page
3. Choose the category you want to find the category ID
4. Hover on the categoryโs edit link and you will see the URL at the bottom with the category ID
5. Alternatively, open the category by clicking on it.
6. Check the category ID from the page URL
Can I use put the AR viewer in and iframe?
You can embed the page of your website containing your AR shortcode into an iframe on your site. or another site. However you may need to do the following to ensure it will work.
In the .htaccess file for your parent site, add this line: Header Feature-Policy: xr-spatial-tracking *;
Then in your iframe tag add: allow=โxr-spatial-trackingโ
What happens when my subscription expires?
When your subscription expires the support for unlimited products, categories and product variations will no longer be available. You will need to renew your subscription for these functionalities to continue to work.
What about Refunds?
If you are not satisfied with the plugin then we offer a full refund within 30 days of purchasing. Please contact us should you wish to receive a refund.
Getting Started
Installation
To get started, youโll need to install the AR for WordPress plugin. You can do this by navigating to the WordPress plugin repository and searching for โAR for WordPressโ or โAR for Woocommerceโ. Once youโve found the plugin, click โInstall Nowโ and then โActivateโ.
AR for WordPress Browse to the AR Models Settings Page found on the left hand side admin menu AR Models -> Settings.
AR for Woocommerce Browse to the AR Models Settings Page found on the left hand side admin menu WooCommerce -> Settings =>AR Display (tab)
Subscription Plan
License Key โ Enter your Premium Licence Key to unlock the customisation options.
Renewal โ Premium subscription renewal date
Model Count โ The number of AR Models in your site
Options
Custom AR Button โ Upload an image file to replace the AR button in the model viewer on AR capable devices.
Custom Fullscreen Button โ Upload an image file to replace the fullscreen popup icon in the model viewer on desktop and laptops.
Custom Play Button โ Upload an image file to replace the play button in the model viewer for models with animations.
Custom Pause Button โ Upload an image file to replace the pause button in the model viewer for models with animations.
Dimension Units โ Choose what units to display the dimensions in โ meters, centimeters, millimiters or inches.
Dimensions Label โ Customise the name of the Dimensions box
Please include AR model id in shortcode. [ar-view id=X] View in AR Label โ Customise the View in AR label for the ar-view shortcode
Please include AR model id in shortcode. [ar-view id=X] View in 3D Label โ Customise the View in 3D label for the ar-view shortcode
Disable/Hide Elements
Dimensions โ Disable the Dimensions option in the model viewer
AR View โ Disable the AR view button in the model viewer on AR capable devices
QR Code โ Disable the QR Code in the model viewer on desktop and laptops
Reset โ Disable the Reset button in the model viewer
Fullscreen โ Disable the Fullscreen button in the model viewer on desktop and laptops
Gallery Size Selector โ Disable the 3D Gallery Builder size selector within the model viewer
Security & Performance
Encrypt ModelURLs โ Secure your model files by encrypting the URLs in the model viewer
Android โ Prioritise Scene Viewer over WebXR โ By default Android users will view models using WebXR, you can prioritise this to use Scene Viewer instead if preferred
Remembering Open Tabs โ Keep the previously open tabs on the model editing page open upon returning to the page
Disable Viewing Model Posts โ Disable the permalinks for armodels
QR Code
Custom QR Logo โ Upload an image file to replace the Logo that appears in the QR code in the model viewer on desktop and laptops.
QR Code Destination โ When a user scans the AR code on their device it can take them to either the โParent Pageโ which is the page currently displaying the AR model, or โModel Viewerโ which opens the model directly in the browser and automatically triggers the AR view once loaded.
User Upload
Upload Button Label โ Customise the Upload Button Label
Default Image/Model โ Choose to display the Default Model, the Featured Image of the post the shortcode is used on, or your Custom model
Custom Default Image/Model โ Upload an image or model file to replace the model that appears in the User Upload model viewer
Element Positions & CSS Styles
Element Positions and CSS Styles โ Choose the position in the model viewer for each of the following elements: AR Button, Dimensions, Fullscreen Button, QR Code, Thumbnail Slides, Play/Pause, Reset Button, Call To Action, Model Variants
CSS Styling โ Add your own custom CSS Styles to change the appearance of various elements.
The first thing to do is gather your 3D model files in the correct formats and settings. Please make sure you do the following:
Set the scale of your model to be in metres. This will ensure your model is displayed at the correct scale in AR view. You can change how the units that the dimensions are displayed in within the model viewer once uploaded.
Ensure your model is orientated correctly. It should be positioned at 0,0,0 on your X,Y,Z axis. If your model is to be positioned on a vertical surface then it should also be standing vertical.
Export your model files in GLB/GLTF and USDZ formats.
Then browse to the add model pages:
AR for WordPress AR Models -> Add New
AR for Woocommerce Products -> Add New => Product Details -> AR Models (tab)
Model Files
GLB/GLTF 3D Model โ Upload your model file to the media library or insert a URL to your model. URLs should always be served via https://. GLB/GLTF files can be used for both Android and iOS (the iOS Quick Look app can convert them on the fly, though perfect results are not guaranteed).
USDZ/REALITY 3D Model โ For guaranteed AR dispay on iOS, upload your model file to the media library or insert a URL to your model. URLs should always be served via https://
Display Options
Skybox/Background Image โ Upload your image file to serve as a skybox-image which links to an equirectangular projection that is used as the skybox, and applied as an environment map to the model
Environment Image โ Upload your image file to set environmental lighting without changing the background
Model Placement โ Select whether you model should be displayed on horizontal or vertical surfaces when viewed in AR
Scale โ Set the X, Y, Z scale to change the size of your model in the desktop view, not available in AR
Field of View โ Control the extent of the observable area within the 3D modelโs environment, specifying the angular range that the viewer can see within the 3D scene
Exposure โ Change the exposure of your model
Shadow Intensity โ Change the shadow intensity of your model
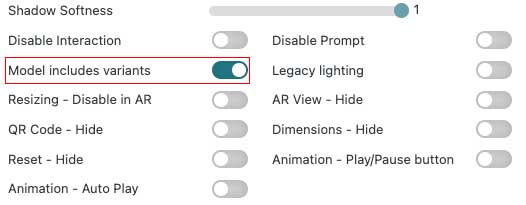
Shadow Softness โ Change the shadow softness of your model
Zoom Restraints โ Restrict the amount a user can zoom in or out
Animation โ Play/Pause button โ Enable the Play Pause Button if your model contains Animations.
Animation โ Auto Play โ Auto play the chosen animation for your model
Legacy lighting โ By default a neutral lighting environment is used that is evenly lit on all sides, but there is also a baked-in legacy lighting primarily for frontward viewing that van be enabled
Emissive Lighting โ Makes surfaces appear self-illuminated, allowing them to glow or emit light without relying on external light sources
Model includes variants โ enable this if your model includes variants and a drop down menu will appear in the model viewer for users to choose the variant
Rotation Limits
Rotation โ Set Limits โ Restrict the amount users can rotate the model in both the X and Y axis
Disable/Hide Elements
Disable/Hide Elements โ Choose which elements and functionalities you wish to disable including AR View Button, Auto Rotate, Dimensions, Interaction Prompt, Resizing in AR, QR Code, Reset Button and Zoom functionality
QR Code Options
QR Code Destination โ When a user scans the AR code on their device it can take them to either the โParent Pageโ which is the page currently displaying the AR model, or โModel Viewerโ which opens the model directly in the browser and automatically triggers the AR view once loaded
Custom QR Logo โ Upload an image file to replace the Logo that appears in the QR code in the model viewer on desktop and laptops
Custom QR Code URL โ Set a custom URL for your QR code to go to
Additional Interactions
Call To Action Button โ Place a CTA button within the model viewer. Button Displays in 3D Model view and in AR view on Android only
Call To Action URL โ Set the URL for your CTA button to go to
Hotspots โ Add your text, click the Add Hotspot button, then click on your model where you would like it placed
Alternative Model for Mobiles
Display a different AR model when viewing on mobile devices โ Choose from an existing model to display when viewing on a mobile device
Display a different AR model when viewing on AR mode โ Choose from an existing model to display when viewing on in AR
Element Positions and CSS Styles
Override GlobalSettings โ Use custom CSS settings for the model instead of the Global settings
Import Global Settings โ Apply the Global settings and CSS to then customise them to this model
Element Positions and CSS Styles โ Choose the position in the model viewer for each of the following elements: AR Button, Dimensions, Fullscreen Button, QR Code, Thumbnail Slides, Play/Pause, Reset Button, Call To Action, Model Variants
CSS Styling โ Add your own custom CSS Styles to change the appearance of various elements.
Insert one of the following shortcodes within your Post, Page or Product content to display the model viewer. Shortcodes shown in orange below must be surrounded in square brackets.
ardisplay โ Displays the featured image of a post using the 3D Gallery Builder ardisplay id=X โ Displays the 3D model for a given model/post id. ardisplay id=โX,Y,Zโ โ Displays the 3D models for multiple comma seperated model/post ids within 1 viewer and thumbnails to select model. ardisplay cat=X โ Displays the 3D models for a given category within 1 viewer and thumbnails to select model. ardisplay cat=โX,Y,Zโ โ Displays the 3D models for multiple comma seperated category ids within 1 viewer and thumbnails to select model. ar-gallery โ Displays the 3D Gallery Model using the featured image of the current post. Includes a size selector. ar-user-upload โ Displays the Model Viewer allowing the end user to drag and drop a model or image file to have it display. ar-view id=X text=trueOR buttons=true โ Display either the AR View button, text links โView in AR / View in 3Dโ or button links for a given model/post id to view it directly. ar-qr โ QR Code shortcode display for the page or post the shortcode is added to.
ar-view default
Dimensions:
ar-view text links
View in AR /
View in 3D
Dimensions:
ar-view button links
Dimensions:
ar-qr
Gutenberg, Widgets & Elementor
You can add the AR Display to your pages using the AR for WordPress and AR for WoocommerceGutenberg blocks. You will also find AR for WordPress and AR for WoocommerceWidgets and Elementor elements.
AR for WooCommerce โ Default Product Image
To display your productโs 3D model in place of the Woocommerce product image on the single product page, copy the woocommerce folder found in the AR for Woocommerce plugin templates folder to your themeโs folder.
Introducing the 3D Gallery Builder โ the perfect solution to transforming ordinary images into stunning 3D art pieces! Immerse yourself in a world where your creativity knows no bounds. With this powerful tool, you can effortlessly upload your favorite jpg or png image, and with a few clicks, watch it come to life ready to hang on the wall.
Tailor your masterpiece by choosing from a frame type and size to perfectly suit your style and space. Ideal for artists, photographers, and anyone with an eye for aesthetics, the 3D Gallery Builder opens up a realm of possibilities for showcasing your visual stories.
Step into a virtual art gallery of your own creation, where each image becomes a captivating centerpiece on your walls. Whether youโre looking to exhibit your photography, display digital artwork, or simply add a touch of sophistication to your living space, the 3D Gallery Builder makes it effortless.
Unlock the potential of your images and turn them into immersive 3D experiences. Elevate your artistry, share your stories, and bring your vision to life with the 3D Gallery Builder โ where every image becomes a masterpiece.
User Upload
Introducing the AR User Upload โ Allow your users to upload their own model or image to view directly in Augmented Reality!
Use the ar-user-upload short code to provide a model viewer that users can drag and drop a GLTF or GLB 3D model file into to view in Augmented Reality.
Users can also upload image files in JPG or PNG format and the image will use the 3D Gallery Builder to produce a 3D model of the image ready to hang on the wall in Augmented Reality.
Model options can be set to custom default values or hidden as follows by setting these attributed in the shortcode.
e.g. ar-user-upload options=โtopโ ratio=โ2:3โณ size=โ2โณ frame=โframedโ color=โ#f8f8f8โณ opacity=โ0.5โณ
options can be top, bottom or none ratio can be 1:1, A4-A1, 2:3, 4:5, 3:4 size can be 1, 1.5, 2, 2.5 frame can be none, mounted, or framed color is a 6 digit hex value opacity is between 0 and 1
You can also use hide_all=true to hide the model options.
To display multiple models in the 1 viewer instance, you simply need to add a list of id numbers id=1,2,3โฒ or you can add a category id number โcat=123โ to your ardisplay shortcode, where 123 is the ID number of the category the models/products belong to. This will display their Featured Images as thumbnails in the bottom corner of the viewer.
ardisplay id=1,2,3 (Contained within square brackets).
ardisplay cat=123 (Contained within square brackets).
Using the AR For WordPress plugin you can find the category ID by going to the โAR Modelsโ -> โAR Categoriesโ page and edit a desired category. When editing your category, the URL for the edit page will tell you the ID number for that category. e.g. https://yourdomain.com/wp-admin/term.php?taxonomy=model_category&tag_ID=123&post_type=armodels
Using the AR For Woocommerce plugin you can find the category ID by going to the โProductโ -> โCategoriesโ page and edit a desired category. When editing your category, the URL for the dit page will tell you the ID number for that category. e.g. https://yourdomain.com/wp-admin/term.php?taxonomy=product_cat&tag_ID=25&post_type=product
With the AR for Woocommerce plugin you can have your model display in place of Woocommerceโs featured image. Copy the woocommerce folder found in the AR for Woocommerce plugin โtemplatesโ folder to your theme folder.
Animation
If you model includes an animation sequence you display this animation using the autoplay and the custom play & pause buttons features.
When editing your model you can enable the autoplay of your animation and whether to show the play and pause buttons by ticking the checkboxes in your model settings.
If you would like to use a custom Play and Pause button you can upload these images to your media library on the AR pluginโs Settings page.
Dimensions:
โAR viewโ example will load an animated robot in Android and an animated flying pteradactal in iOS.
Variants
GLTF Models can also include variants to allow the user to change textures and colours in a model. Be sure to select the โModel includes variantsโ option when adding your AR model to your website.
Please contact us with your support enquiries and we will endeavour to assist you. Please include details of any issue you may be having and urlโs to the page where you are displaying your AR models using the plugins if applicable.
"*" indicates required fields
Feature Request
If you have any ideas or features you would like to see included in the AR plugins, please get in touch and we would love to explore how we can improve both the user and admin experience of the plugins.
We may request cookies to be set on your device. We use cookies to let us know when you visit our websites, how you interact with us, to enrich your user experience, and to customize your relationship with our website.
Click on the different category headings to find out more. You can also change some of your preferences. Note that blocking some types of cookies may impact your experience on our websites and the services we are able to offer.
Essential Website Cookies
These cookies are strictly necessary to provide you with services available through our website and to use some of its features.
Because these cookies are strictly necessary to deliver the website, refusing them will have impact how our site functions. You always can block or delete cookies by changing your browser settings and force blocking all cookies on this website. But this will always prompt you to accept/refuse cookies when revisiting our site.
We fully respect if you want to refuse cookies but to avoid asking you again and again kindly allow us to store a cookie for that. You are free to opt out any time or opt in for other cookies to get a better experience. If you refuse cookies we will remove all set cookies in our domain.
We provide you with a list of stored cookies on your computer in our domain so you can check what we stored. Due to security reasons we are not able to show or modify cookies from other domains. You can check these in your browser security settings.
Other external services
We also use different external services like Google Webfonts, Google Maps, and external Video providers. Since these providers may collect personal data like your IP address we allow you to block them here. Please be aware that this might heavily reduce the functionality and appearance of our site. Changes will take effect once you reload the page.
Google Webfont Settings:
Google Map Settings:
Google reCaptcha Settings:
Vimeo and Youtube video embeds:
Privacy Policy
You can read about our cookies and privacy settings in detail on our Privacy Policy Page.